
In this Opencart tutorial, we are covering OpenCart 4 OCMOD and show how to start coding in OCMOD to change the files and extend the functionalities of Opencart. We hope this helps to learn step-by-step instructions to master OCMOD elevate your e-commerce store to new heights and develop multiple Opencart extensions with OCMOD.
OCMOD is a system that allows store owners to be able to modify their store by uploading a compressed file that contains XML, SQL, and PHP files. OCMOD helps to modify OpenCart stores without changing any of the core files. This means that we did not need to restore or fix Opencart files when we removed modifications.
Here we will show the flows that happened when someone uploads the ***.ocmod.zip file, then create a test.ocmod.xml file to show the module link in the left column and give you details of Ocmod documentation in Opencart 4.
Files and folder structure OCMOD extension
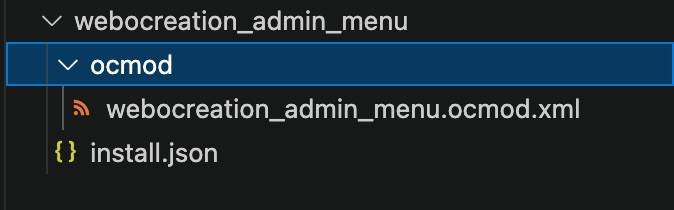
All the ocmod xml should be inside the ocmod folder. Here in the example we are creating the webocreation_admin_menu extension folder inside it are the install.json and ocmod folders. In the ocmod folder, we add the XML file, the XML file name should be the same as the code. Here the file name is webocreation_admin_menu.ocmod.xml and in the XML the code is <code>webocreation_admin_menu</code>
Flow of OCMOD
Upload of extension with OCMOD
As per the core code when you upload the ***.ocmod.zip folder from Extensions >> Installer, the following things will happen:
- Check if the user has permission. You will get an error like:
“Warning: You do not have permission to modify modifications!” - Check if there is an install temporary folder zip already there. If it found the file and the file created time is less than 5 seconds then it tries to unlink or remove the file, if it cannot remove the file then it throws an error saying:
“Extension installation taking place please wait a few seconds before trying to install!” - It checks whether the filename is between 3 and 128 characters or not. If not it will show an error like this:
‘Filename must be between 3 and 128 characters!’; - It checks whether the uploaded zip file ends with .ocmod.zip
- It checks if there are any other file uploading errors, UPLOAD_ERR_OK: Value: 0; There is no error, and the file uploaded with success. If there is any error it will show errors like:
“File could not be uploaded!” - If everything is good then it creates a .tmp file and performs the function move_uploaded_file.
- Then it checks if the module file already exists or module code is already in the database or not. If exists throws the following error:
‘Extension already installed!’ - If all the above are good then it validates if the file can be opened and there is install.json that can be read. If it cannot find the install.json, then it throws the following error:
‘Warning: Could not find install.json!’ - If there is an issue with unzipping of ocmod.zip file then it throws the following error:
‘Zip file could not be opened!’
Database Operation
- If everything is fine then it gets all the info from the install.json. It gets the name, description, code, version, author, and link
- Then finally it adds the extension details to the database table oc_extension_install. The query ran is below:
$this->db->query(“INSERT INTO `” . DB_PREFIX . “extension_install` SET `extension_id` = ‘” . (int)$data[‘extension_id’] . “‘, `extension_download_id` = ‘” . (int)$data[‘extension_download_id’] . “‘, `name` = ‘” . $this->db->escape($data[‘name’]) . “‘, `description` = ‘” . $this->db->escape($data[‘description’]) . “‘, `code` = ‘” . $this->db->escape($data[‘code’]) . “‘, `version` = ‘” . $this->db->escape($data[‘version’]) . “‘, `author` = ‘” . $this->db->escape($data[‘author’]) . “‘, `link` = ‘” . $this->db->escape($data[‘link’]) . “‘, `status` = ‘0’, `date_added` = NOW()”);
As you see the status is still 0. The file upload is complete and extension info is added to the database.
The upload is complete.
Installation of OCMOD extension
You will see extensions listed at Extensions >> Installer. You will see something like below:
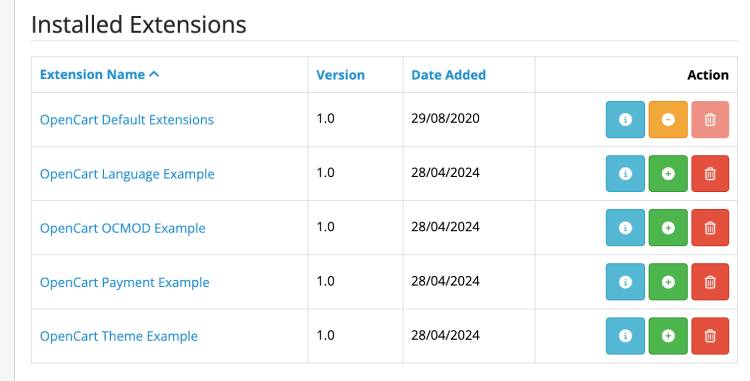
Now, we are showing the flows that happened when you click the Install button for the Opencart OCMOD Example extension.
- Check if the user has permission. You will get an error like:
“Warning: You do not have permission to modify modifications!” - Then it gets the details of the extension from oc_extension_install database table
- It makes sure the file exists in the storage folder >> Marketplace. If the file is not found then it shows an error like this:
‘Install file %s could not be found!’; - If there are no errors, then it starts unzipping the ***.ocmod.zip and if it cannot unzip the ocmod.zip file then it shows an error like:
“Zip file could not be opened!” - After unzipping it checks if any of the files already exist. It only extracts the contents of the upload folder. If there are images, it copies the images, then it stores the path differently for vendor folders.
- It checks if the path is not a directory and checks if there is no existing file, then it puts the file and adds the path in the oc_extension_path database table.
- It enables the module by updating the status of the module at oc_extension_install database table
- It adds the XML code in the oc_modification table

- Finally, it gives the success message.
- Go to Extensions and Modifications and Install the extension by clicking the green install button
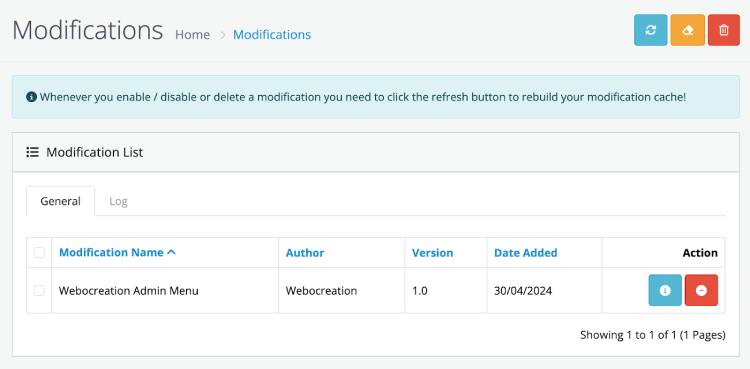
- Click the Clear icon and you will see the applied OCMOD
OCMOD developer tips
- The extension folder needs ocmod folder
- File name except ocmod.zip and <code> value should be same.
- While zipping the folder zip the install.json and ocmod/ folder, not the folder.
- Testing is hard for OCMOD changes if you have to change in XML, zip, upload from the installer, and clear in modifications. So the tip for developers is they can upload the extension and enable it, then make changes in the extension code from the extension folder and you don’t need to zip and upload again and again, you can just clear the cache in modifications and you can check the changes, and once you are satisfied you can copy and make the extension and upload it.
- oc_modification, oc_extension_install, and oc_extension_path are the three database tables that are touched after the ocmod extension is uploaded and installed.
Example OCMOD code
In the install.xml it should be something like where the ******* is your custom thing.
<?xml version="1.0" encoding="utf-8"?>
<modification>
    <name>*******</name>
    <version>*******</version>
    <author>*******</author>
    <link>*******</link>
    <code>*******</code>
    <description>*******</description>
    <file path="*******">
        <operation>
            <search><![CDATA[ ******* ]]></search>
            <add position="*******"><![CDATA[*******]]></add>
        </operation>
    </file>
</modification>
Don’t forget <code>, although it is not mentioned in the Modification system documentation https://github.com/opencart/opencart/wiki/Modification-System. You can use multiple file operations. There are two operations search and add. With the add operation, you can replace, add before, or add after by adding in the position.
<file path="">
    <operation>
        <search><![CDATA[]]></search>
        <add position=""><![CDATA[]]></add>
    </operation>
</file>
Controller OCMOD code example
<file path="admin/controller/catalog/attribute.php">
        <operation>
            <search>
                <![CDATA[Opencart\Admin\Controller\Catalog;]]>
            </search>
            <add position="replace">
                <![CDATA[Opencart\Admin\Controller\Extension\Ocmod\Catalog;]]>
            </add>
        </operation>
        <operation>
            <search regex="false">
                <![CDATA[$this->load->language('catalog/attribute');]]>
            </search>
            <add position="before">
                <![CDATA[echo 'BEFORE WORKS</br>';]]>
            </add>
        </operation>
        <operation>
            <search regex="false">
                <![CDATA[$this->load->language('catalog/attribute');]]>
            </search>
            <add position="after">
                <![CDATA[echo 'AFTER WORKS</br>';]]>
            </add>
        </operation>
        <operation>
            <search regex="false">
                <![CDATA[controller_catalog_attribute]]>
            </search>
            <add position="replace">
                <![CDATA[controller_extension_ocmod_catalog_attribute]]>
            </add>
        </operation>
        <operation>
            <search regex="false">
                <![CDATA[$this->load->language('catalog/attribute');]]>
            </search>
            <add position="replace">
                <![CDATA[$this->load->language('catalog/attribute');
                echo 'REPLACE WORKS</br>';
                ]]>
            </add>
        </operation>
    </file>
Model OCMOD code example
<file path="admin/model/catalog/attribute.php">
        <operation>
            <search>
                <![CDATA[Opencart\Admin\Model\Catalog;]]>
            </search>
            <add position="replace">
                <![CDATA[Opencart\Admin\Model\Extension\Ocmod\Catalog;]]>
            </add>
        </operation>
        <operation>
            <search regex="false">
                <![CDATA[public function addAttribute(array $data): int {]]>
            </search>
            <add position="before">
                <![CDATA[echo 'MODEL BEFORE WORKS</br>';]]>
            </add>
        </operation>
        <operation>
            <search regex="false">
                <![CDATA[public function addAttribute(array $data): int {]]>
            </search>
            <add position="after">
                <![CDATA[echo 'AFTER WORKS</br>';]]>
            </add>
        </operation>
    </file>
View OCMOD example code
<file path="admin/view/template/catalog/attribute.twig">
        <operation>
            <search regex="false">
                <![CDATA[<div class="float-end">]]>
            </search>
            <add position="before">
                <![CDATA[        // BEFORE WORKS]]>
            </add>
        </operation>
        <operation>
            <search regex="false">
                <![CDATA[<div class="float-end">]]>
            </search>
            <add position="after">
                <![CDATA[        // AFTER WORKS]]>
            </add>
        </operation>
    </file>
Library OCMOD code example
<file path="system/library/template/template.php">
        <operation>
            <search regex="false">
                <![CDATA[include]]>
            </search>
            <add position="after">
                <![CDATA[        // AFTER WORKS]]>
            </add>
        </operation>
    </file>
Admin Extension OCMOD code example
<file path="extension/opencart/admin/controller/report/customer_order.php">
<operation>
<search>
<![CDATA[Opencart\Admin\Controller\Extension\Opencart\Report;]]>
</search>
<add position="replace">
<![CDATA[Opencart\Admin\Controller\Extension\Ocmod\Extension\Opencart\Report;]]>
</add>
</operation>
<operation>
<search regex="false">
<![CDATA[$this->load->language('extension/opencart/report/customer_order');]]>
</search>
<add position="after">
<![CDATA[echo 'WORKS!';]]>
</add>
</operation>
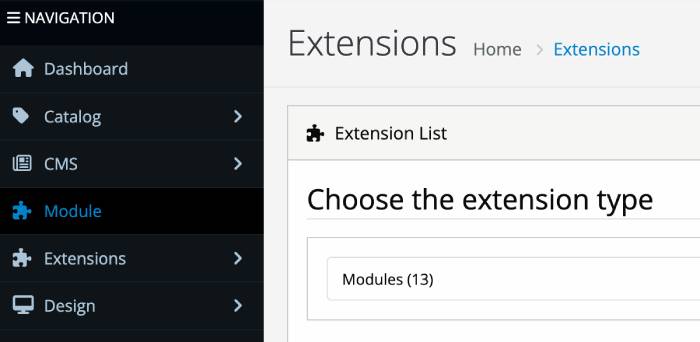
</file>Admin Module menu addition with OCMOD extension
We created a free module with OCMOD to show the Module link in the left menu of the admin section so that we can directly go to the Module section and don’t need to keep on using the Extension filter. Here is the output.
Folder creation of OCMOD extension
- Create a folder and name it anything like for example webocreation_admin_menu
- Inside that folder create install.json file
- Inside webocreation_admin_menu folder, create ocmod folder
- Inside the ocmod folder, create an XML file named webocreation_admin_menu.ocmod.xml
Code of install.json file
{
  "name": "Webocreation Admin Menu",
  "version": "1.0",
  "author": "Webocreation",
  "link": "https://www.webocreation.com"
}
Code of webocreation_admin_menu.ocmod.xml
<?xml version="1.0" encoding="utf-8"?>
<modification>
    <name>Webocreation Admin Menu</name>
    <description>Add a Module link in top menu item in the Admin section.</description>
    <code>webocreation_admin_menu</code>
    <version>1.0</version>
    <author>Webocreation</author>
    <link>https://webocreation.com</link>
    <file path="admin/controller/common/column_left.php">
        <operation>
            <search regex="false">
                <![CDATA[if ($marketplace) {]]>
            </search>
            <add position="before">
                <![CDATA[
                if ($marketplace) {
                    $data['menus'][] = [
                        'id'       => 'menu-extension',
                        'icon'     => 'fas fa-puzzle-piece',
                        'name'     => 'Module',
                        'href'     => $this->url->link('marketplace/extension', 'user_token=' . $this->session->data['user_token'].'&type=module'),
                        'children' => []
                    ];
                }
                ]]>
            </add>
        </operation>
    </file>
</modification>
OCMOD error log
You can see the OCMOD error log at the Extensions >> Modifications >> Log tab.
Some of the error codes:
It shows an error like the one below in the Ocmod log when the search code is not found
MOD:
FILE: admin/controller/common/column_left.php
CODE: if ($this->user('access', 'marketplace/modification')) {
NOT FOUND - OPERATIONS ABORTED!
In this way, you can develop an Opencart 4 extension with OCMOD. We hope this helps to learn step-by-step instructions to master OCMOD and elevate your e-commerce store to new heights. Please let us know if you have any kind of projects, you can email us at webocreation.com@gmail.com. Please subscribe to our YouTube Channel and get more Opencart free extensions and tutorials. You can also find us on Twitter and Facebook.


